Sewing machines
by Chris Woodford. Last updated: July 19, 2023.
Machines might seem boring and mundane things—dirty and noisy and full of fuss—but just try imagining life without them. Take sewing machines, for example. Without those tireless, automatic cloth stitchers, thumping their needles up and down all day long, you wouldn't have all those fancy clothes in your wardrobe, and the ones you did have wouldn't be anything like as decorative or cheap. Modern fashions and textiles can be fabulously arty and creative, but they depend on surprisingly humdrum bits of engineering: electric motors; cranks and cams; wheels, gears and levers—the kind of clanking metal bits and bobs more at home inside a car! So why does a sewing machine need all this stuff inside it? Let's take a closer look!
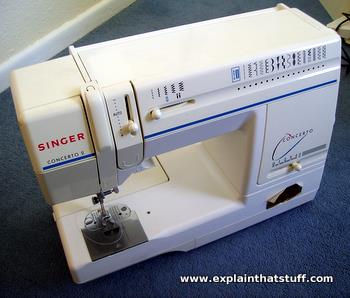
Photo: A typical Singer electronic sewing machine. Singer has been one of the most popular makes since the 1850s, when Isaac Singer patented his first machine.
Sponsored links
Contents
How can a machine sew?
Remember when you first learned to sew with a needle and a length of cotton thread? The technique you used back then (and you probably still use it for simple hand repairs) is called running stitch. Suppose you want to join two pieces of flat material together. You thread a needle with a length of cotton (maybe doubling it up for strength), press the two pieces of material together, then simply push the needle through them so it takes the cotton with it. You pull the needle right through, move it along the material a little bit to form a stitch, then push it back through the material in the opposite direction, leaving some of the thread (the stitch) behind. In this kind of hand sewing, you use a single thread, and the stitches form alternately on the upper and lower sides of the material.
If that's your idea of sewing, you've probably never quite been able to figure out how a sewing machine works. If it keeps raising and lowering its needle, how can it possibly pass the thread back and forth without getting all tangled up? If the needle pokes the thread down through the material and then pulls it straight back up again, how does a stitch form at all? Isn't the stitch getting undone when the needle comes back up? It just doesn't make any sense! This problem challenged many inventors during the 19th century, who struggled with ways of mechanizing the process used by a skilled human seamstress. It's easy to see how a robot arm could sew running stitch, because it could just hold a needle the same way you do and repeat exactly the same motions. But an ordinary sewing machine clearly can't stitch that way because it never "lets go" of the needle, pushes it right through the material, or reverses its direction. And, in any case, they didn't have robots in those days!

Artwork: Running stitch, used for hand stitching, is almost impossible to do with a sewing machine, because it involves constantly removing the needle from the material and reversing direction.
So the secret behind sewing machines is that they work a totally different way, using a different kind of stitch and two totally separate threads, one fed from above (by the needle) and a second one fed from below (by a reel called a bobbin mounted in a rotating carrier called a shuttle). The needle pushes the thread down through the material, forming a loop that catches on a hook on the shuttle. The loop wraps around the bobbin thread as the needle pulls the next section of thread back up through the material. So what the needle is actually doing is repeatedly feeding thread down through the material to form successive stitches. This kind of automatic stitching with two threads instead of one is called lock stitch.

Photo: The shuttle and bobbin live in a drawer that slides open just beneath the presser foot.
What is a sewing machine?

A sewing machine is, obviously enough, "a machine that sews," but if you think about those words literally, it can help you figure out how it works. Let's say we had a big construction set with standard, snap-together, engineering components in it; which bits would we need to make a sewing machine? The answer is surprisingly few.
Although you can still find the odd hand-powered sewing machine (and you can operate any machine slowly by hand if you want to for slow, precision work), virtually all modern sewing machines are electric: they're built around quite hefty electric motors (roughly the same size as the ones you find in vacuum cleaners and lawn mowers). Pushing a tiny little needle up and down through multiple layers of thick fabric is hard work; and lifting and feeding the fabric takes effort as well. If you've ever sewn something like a pair of curtains, you'll know it can be quite exhausting turning and moving the fabric, but a sewing machine helps you do that job as well.
The beating "heart" of a sewing machine is the electric motor, which is hidden inside the main stem of the machine usually quite near to the place where you plug in the power cord. The motor drives three separate mechanisms that are very carefully timed to cooperate with one another. Two of them, a mixture of cams and cranks, operate the feed dog, that little set of teeth that pop up and down just beneath the needle and the presser foot (which holds the material in place); one pushes upward against the material (to grip it) and the other moves it forward by an adjustable amount (to make stitches of varying length). It's actually a rather neat double-act: one of these mechanisms makes the feed dog go up and down, while the other slides it back and forth. Meanwhile, another crankshaft driven by the motor makes the needle rise up and down, while the fourth and final mechanism turns the shuttle and hook attached to it that makes the stitches.

Photo: Side view: You can just see the teeth of the feed dog hiding beneath the presser foot, with the shuttle and bobbin in the little drawer at the front. During normal sewing, the drawer is closed.
Until the 1970s, most machines were electrical and entirely mechanical; today, many are electronic, which means they work under microchip control, allowing them to make quite complex decorative stitch patterns with relatively little effort on the part of the operator (beyond positioning and turning the fabric). Modern machines have at least one circuit board and (quite often) an electronic display to help you set things up.
How does a sewing machine work?
I spent a long time thinking about how best to illustrate the inner mechanisms of a sewing machine and looking at quite a few artworks other people have struggled to draw. So many moving parts are packed into such a small space that it can be difficult to figure out which bit is doing what. The more accurate the drawing, often the harder it is to understand, and I think it's actually clearer to look at the key mechanisms separately. These diagrams are simplifications that give you a general idea of what's happening; they're not absolutely faithful to what's happening and they don't show what's going on inside any specific machine.
The electric motor rests at the bottom at the opposite end of the machine from the needle. Using a pulley arrangement, it drives the large handwheel at the top (the wheel you can turn to stitch slowly and carefully), which is shown red in these diagrams, and the main powershaft (gray). Let's look at the three key mechanisms in turn.
1. Needle mechanism
This is the simplest mechanism of the three. The gray shaft drives a wheel (blue) and crankshaft (green) that makes the needle (black) rise and fall. The crank converts the motor's rotary (round-and-round) motion into the needle's reciprocal (up-and-down) motion.

Artwork: How a simple crank makes the needle rise and fall.
2. Bobbin and shuttle mechanism
As we'll see in a moment, the shuttle and hook that make stitches from the needle thread have to rotate somewhat faster than the needle. So the gray shaft has to turn the shuttle more quickly, which it can do using gears (or pulleys wrapped round wheels of different sizes).

Artwork: How pulleys or gears can be used to turn the shuttle (brown), which contains the bobbin (yellow).
3. Feed-dog mechanism
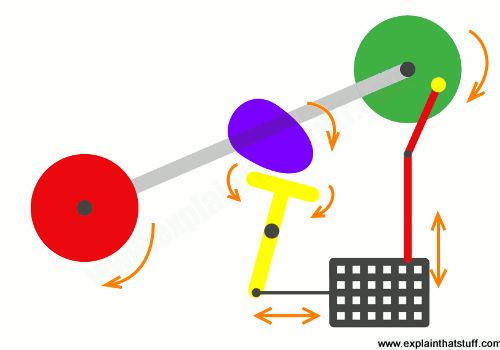
The feed-dog moves the fabric through the machine at a steady speed, so ensuring stitches that are of equal length. It works by moving upwards and forwards at the same time, which happens through two interlinked mechanisms driven off the main shaft. I've drawn one of them (in the center) as a cam (blue), an egg-shaped wheel that makes a lever (yellow) rock back and forth, so pulling the feed dog from right to left and then back again. At the same time, a second crank mechanism (green and red) moves the feed dog up and down. When these two movements are synchronized, the feed dog works a bit like a shoe on the end of an upside-down leg. Normally, a shoe on your leg moves down and backward, then lifts up and repeats the same movement, pushing back against the ground so your body moves forward. But a feed dog (with the shoe in effect pointing upward) moves upward and forward, "walking" the material through the machine one step (one stitch!) at a time.

Artwork: How two separate mechanisms driven by the main shaft make the feed dog rise and fall and move back and forth.
How does a sewing machine stitch?
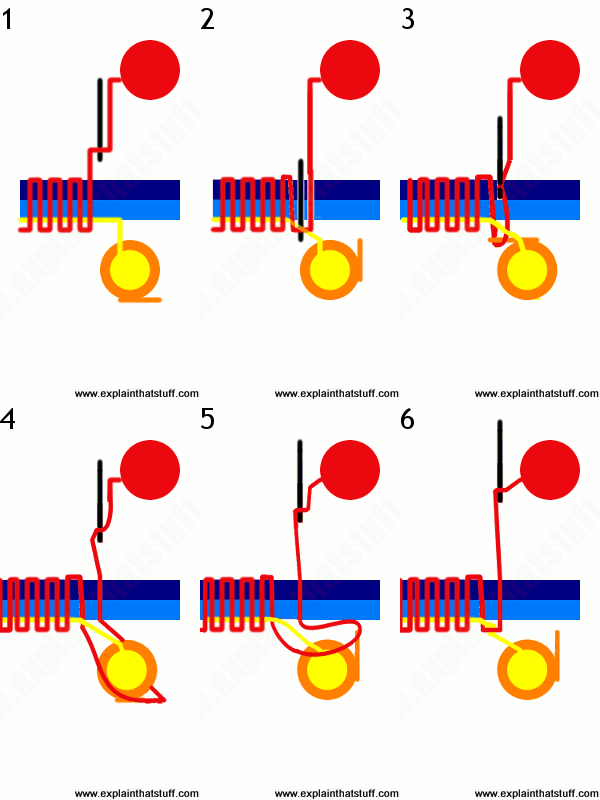
These three mechanisms are carefully coordinated so the machine can make perfect, equal-sized stitches, which is what this simple animation shows. Here, we're looking side-on at the machine. The top thread (sometimes called the needle thread) is colored red and pokes through the eye of the needle (black), while the bottom thread is yellow and feeds from the bobbin (the yellow circle). The pieces of material we're sewing together are two different shades of blue. As you can see, the bobbin sits inside a rotating orange case (the shuttle) with a hook extending from it. Step by step, here's how the stitches form.

Artwork: How a sewing machine makes lock stitches with two separate threads.
- The needle starts off high and moves down toward the fabric. Although it's not yet obvious, what it's doing at this point is feeding a length of the red thread through the material to form the next stitch. The needle thread is tensioned to stop too much thread pulling off too quickly.
- The needle punctures the material, taking the red thread with it. Notice how the shuttle (under the fabric you're sewing) is rotating and the hook on the end (the orange line extending upward in frame 2) is approaching the needle thread.
- The needle starts to rise up again but it leaves behind a loop of the red thread, which is the beginning of the next stitch. The shuttle hook now passes through this loop and catches on it.
- The needle keeps on rising but the main action is happening down under the material, where the shuttle hook drags the red loop right around so that it locks around the bobbin thread.
- The needle, pulling upwards, tightens the red thread and pulls it back up off the shuttle hook.
- The needle, still pulling upwards, pulls the stitch tight. The red and yellow threads are properly locked together, and we're ready for the process to repeat to make the next stitch.


